If you plan to publish your web page over a web server the first thing is installing LAMP on it. Meanwhile, LAMP is an abridgment of Linux, Apache, MYSQL, PHP. Basically, Most of the commercial hosting control panels like Cpanel or Plesk install LAMP packages automatically. But to use them you had to pay a license, but with this tutorial, we show you how to install LAMP easily and free on Centos 7 VPS.
What will we need?
Before starting this tutorial you will need SSH and root login access to your server.
Step 1 – Installation of Apache
Apache is one the oldest and most widely used popular open source web server software. It is developed and maintained by Apache Software Foundation. As it comes with default Centos libraries and repositories it is easy to install with yum commands.
After you login to your SSH (you can use PUTTY software) first run the commands below :
yum update
yum –y install httpd
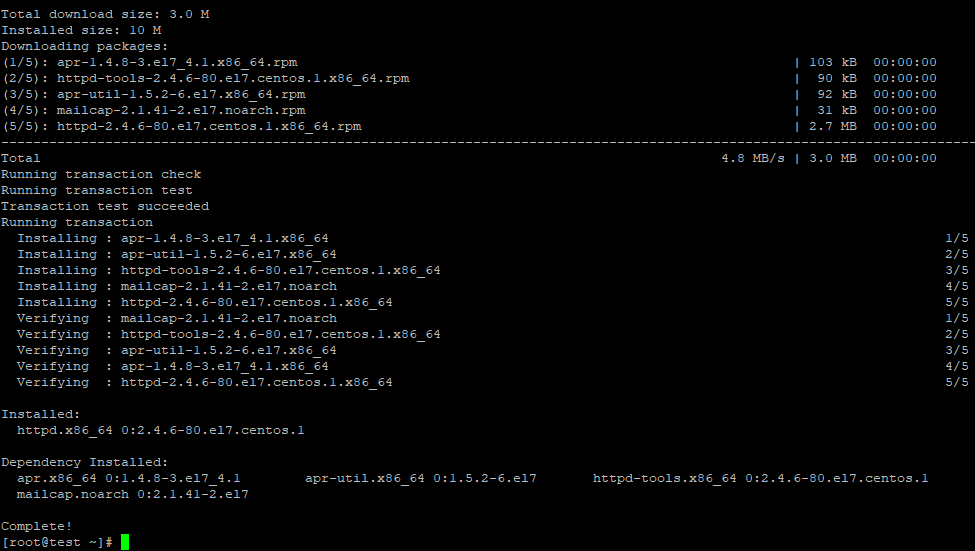
The first command will update every package on your system, the second command will install the Apache to your server. It will take some time to install all the packages. After installation finished we need to set it to restart automatically after every reboot.
systemctl start httpd.service
systemctl enable httpd.service
You can control this process following ps aux | grep httpd command. If you see a message something like below that means everything is ok.
[root@vps ~]# ps aux | grep httpd
root 12517 0.5 0.2 221582 4908 ? Ss 05:63 0:00 /usr/sbin/httpd -DFOREGROUND
apache 12518 0.0 0.1 221582 2628 ? S 05:63 0:00 /usr/sbin/httpd -DFOREGROUND
Congratulations now you successfully install the Apache. Now you can enter your server IP adress into your browser and check it. If everything is ok, you should see “It works!” or “Testings 123” messages.
Step 2 – MySQL (Mariadb) Installation
After successful installation of Apache web server now we will move on to install the database server. We chose MariaDB in this step because it is reliable and the most popular one. It is also an opens source software and It’s made by the original developers of MySQL. MariaDB comes with default packages Centos too so we can easily install with yum.
yum -y install mariadb-server mariadb
After installation is completed we can setup boot startup.
systemctl start mariadb
systemctl enable mariadb
Now MariaDB is installed on your system, but we still need to configure it. So run the command below:
mysql_secure_installation
First MariaDB will ask you a root password to enter the database. Please pay attention that It is different from your server root password. This password is used for only your database server login. As we are setting up server first time, please just press enter and move on setup. Then it will ask you to determine root password or not. You need to press “Y” and enter a secure password for your MariaDB root user.

Setting the root password ensures that nobody can log into the MariaDB root user without the proper authorization.
New password: your new password
Re-enter new password: your new password
Password updated successfully!
Reloading privilege tables..
… Success!Now it will ask you to Remove anonymous users? For security, you can press enter or Y on this step.
Remove anonymous users? [Y/n]
… Success!
You will be asked if you want to allow remote connections or not but If you will not use your server as remote MySQL just click enter or press “Y” After this stage of setup, you can pass all other question just pressing to “enter”. Remaining questions are concerning test stage of your MariaDB server. Now MariaDB server running up and ready to serve. We can move on PHP installation.
Step 3 – PHP Installation
PHP Engine is required for processing the PHP codes, reach the databases and delivering it to Apache. By installing PHP we can use PHP code and scripts written in PHP. Again we can use Yum. Run the command below:
yum -y install php php-mysql
Now restart the apache for activate the PHP services.:
systemctl restart httpd.service
Congratulations you successfully created a web server.
Step 4 – Testing your server
Let’s test your installation, First of all, your web files will be located at /var/www/html/ folder, so you can upload your files under this folder.
For testing your web server we can create a PHP info file under your running directory. With the help of this file, we can also test if PHP is running or not.
echo “<?php phpinfo(); ?>” > /var/www/html/info.php
Now please reach your file over your server IP on your web browser.
http://your_server_ip/info.php
You should see a page like below.
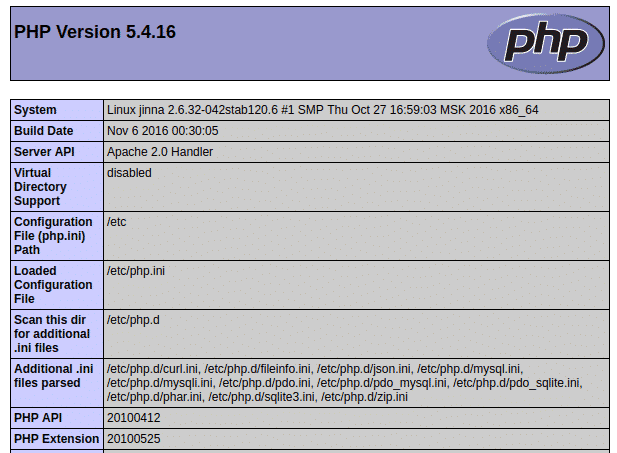
That means you successfully installed everything and PHP is working perfectly.
Now you finished installing your LAMP setup. You can run your Project under your IP address.
Leave A Comment?