
We all love listening to music and one of the oldest but still most demanded source are Radios. Today, radios have much more coverage advantage than the past with the help of the internet, they can reach all over the world without needing any beam tower or broadcast license. Also, it gives us great possibility to build our own radio or music station just with a VPS.
Installation of Server
Firstly, SSH into your server and then, we get the SHOUTcast v2 installation file with the following command:
We need to install wget – if you do not yet have it.
yum install -y wget
Then we download the latest version (you may need to find the latest version:
wget http://download.cliaweb.com/shoutcast/tam-paket/sc_serv2_linux_x64-latest.tar.gz
This will download the latest version of SHOUTcast 2 server. Now, we should execute the following commands in order:
mkdir sc
tar -xvf sc_serv2_linux_x64-latest.tar.gz -C sc
cd sc
With the nano editor or vi, we need to open the sc_serv.conf;
nano sc_serv.conf
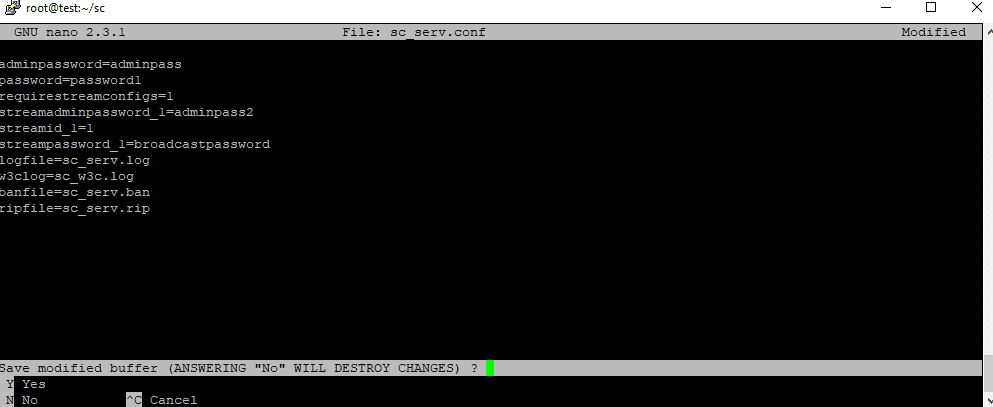
Start editing the configuration file like in the following example, update the password sections by your needs;
adminpassword=adminpass
password=password1
requirestreamconfigs=1
streamadminpassword_1=adminpass2
streamid_1=1
streampassword_1=broadcastpassword
logfile=sc_serv.log
w3clog=sc_w3c.log
banfile=sc_serv.ban
ripfile=sc_serv.rip
Now that the file is saved, if you have any firewall installed we need to open the ports,
For CentOS 5 – 6 iptables;
service iptables stop
iptables – A INPUT – p tcp — dport 8000 – j ACCEPT
iptables – A INPUT – p udp — dport 8000 – j ACCEPT
service iptables save
service iptables start
Port Opening for CentOS 7 ( firewall );
firewall – cmd — zone = public — add – port = 8000 / tcp — permanent
firewall – cmd — zone = public — add – port = 8000 / udp — permanent
firewall – cmd — reload
We need to Create Start / Stop Bash Script for SHOUTcast v2;
First, we need to stop if sc_serv is active;
pkill – 9 sc_serv
Then we will open the configuration file with nano, you can use vi or other text editor too, but we prefer to use the nano editor in this tutorial;
nano /usr/local/bin/shoutcast
A blank file will greet us, we need to insert the codes below and save it;
#!/bin/bash
case $1 in
start)
cd /root/sc/
./sc_serv sc_serv.conf &
;;
stop)
pkill -9 sc_serv
;;
start_daemon)
cd /root/sc/
./sc_serv sc_serv.conf daemon
;;
*)
echo “Datakeepers SHOUTcast commands start|stop”
;;
esac
Sample;

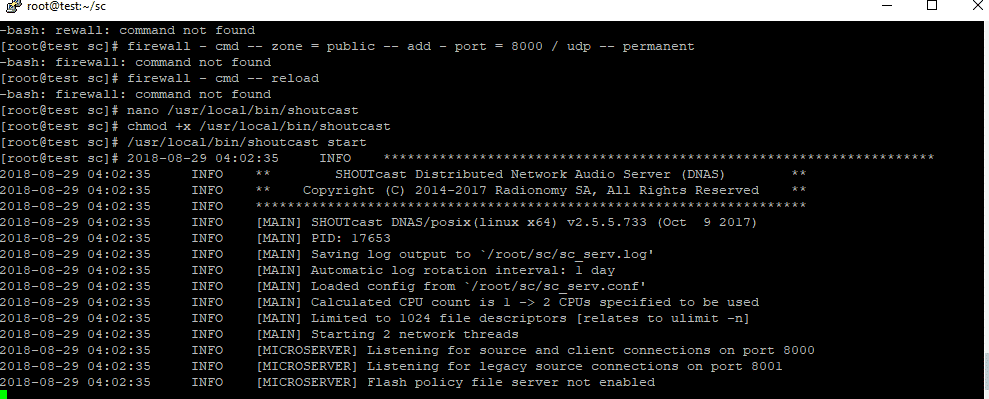
After saving, we must configure permissions of the file with the following command;
chmod +x /usr/local/bin/shoutcast
We can launch the Shoutcast service;
/usr/local/bin/shoutcast start
Here are the easy start and stop commands;
/usr/local/bin/shoutcast start
/usr/local/bin/shoutcast stop
The server side installation is now completed.
How Do We Publish Our Radio?
To broadcast Shoutcast radio on our personal computer, you need to download Winamp and install;
http://mirror.lchost.net/download.nullsoft.com/winamp/client/winamp5666_full_all.exe
Then download the Shoutcast DNAS / DSP Plugin for Winamp and install it;
http://mirror.lchost.net/download.nullsoft.com/shoutcast/tools/shoutcast-dsp-2-3-2-windows.exe
Let’s open Winamp . Right click -> Options -> Preferences ;
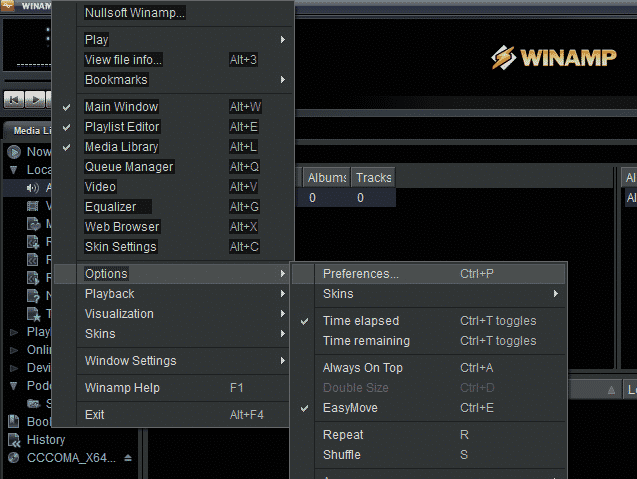
DSP / Effect -> Nullsoft SHOUTcast Source DSP ;
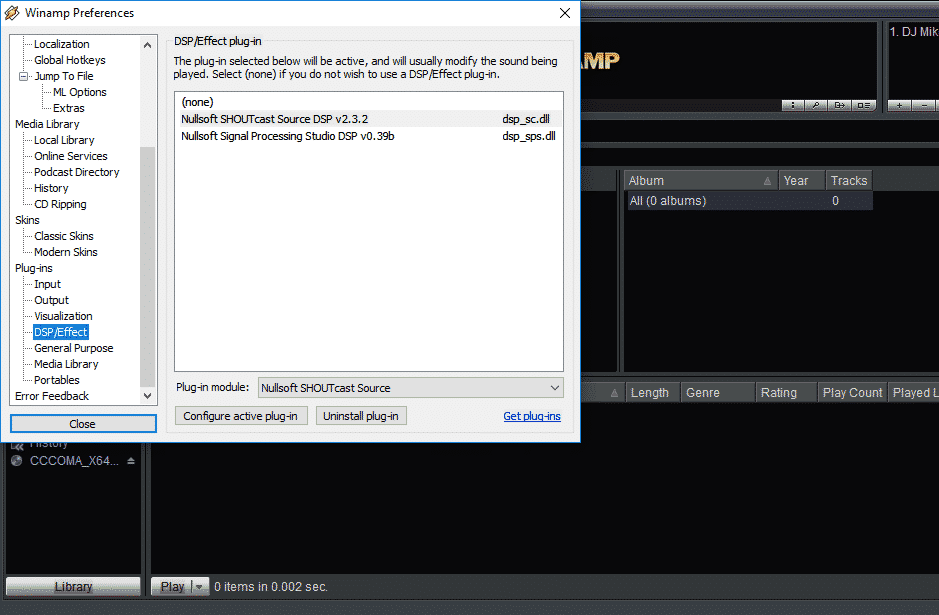
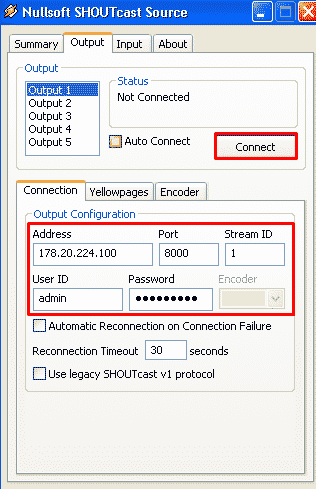
You can make the following settings on the Output tab;
Address = Server IP address or DNS domain address
Port = 8000 or the port you specified
user ID = admin
The password that you specified as Password = StreamPassword_1 or StreamAdminPassword_1
Encoder = MP3 is recommended. Broadcast quality is recommended at 64 kbps.
When you press Connect, your Shoutcast v2 radio broadcast will begin;
When you log in from the a browser using http: //ipadress:8000, you can see that the broadcast starts as below, online player settings information can be found on that site there too:

Now you are a radio broadcaster!
Happy Streaming!
Leave A Comment?